pytestx容器化执行引擎

系统架构
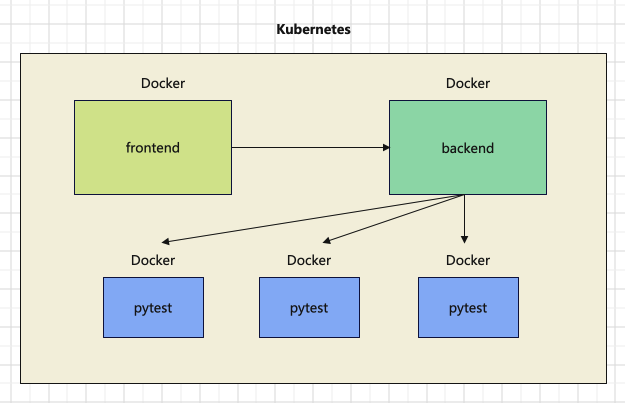
前端、后端、pytest均以Docker容器运行服务,单独的容器化执行引擎,项目环境隔离,即用即取,用完即弃,简单,高效。
前端容器:页面交互,请求后端,展示HTML报告
后端容器:接收前端请求,启动任务,构建镜像,触发运行pytest,挂载HTML报告
pytest容器:拉取项目代码,指定目录执行,生成HTML报告
说明:构建镜像目前是在宿主机启动后端服务来执行docker命令的,暂未支持Kubernetes编排。宿主机安装了Docker,启动服务后,可以执行docker命令。如果采用容器部署后端,容器里面不包含Docker,无法构建,个人想法是可以借助K8S来编排,当前版本还未实现
系统流程
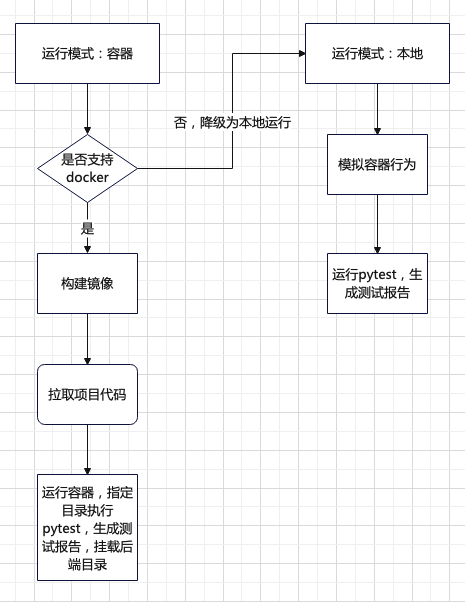
支持2种运行模式配置:容器和本地。
容器模式:判断是否支持docker,如果支持,构建pytest镜像,在构建时,通过git拉取项目代码,再运行容器,按照指定目录执行pytest,生成测试报告,并将报告文件挂载到后端。如果不支持,降级为本地运行。
本地模式:模拟容器行为,在本地目录拉取代码,执行pytest,生成测试报告。
平台大改造
pytestx平台更轻、更薄,移除了用例管理、任务关联用例相关功能代码,只保留真正的任务调度功能,backend的requirements.txt解耦,只保留后端依赖,pytest相关依赖转移到tep-project。
那如何管理用例呢?约定大于配置,我们约定pytest项目已经通过目录维护好了一个稳定的自动化用例集,也就是说需要通过平台任务调度的用例,都统一存放在目录X下,这些用例基本不需要维护,可以每日稳定执行,然后将目录X配置到平台任务信息中,按指定目录执行用例集。对于那些不够稳定的用例,就不能放到目录X下,需要调试好以后再纳入。
为什么不用marker?pytest的marker确实可以给测试用例打标记,也有人是手动建立任务和用例进行映射,这些方式都不如维护一个稳定的自动化用例集方便,在我们公司平台上,也是维护用例集,作为基础用例集。使用pytest项目同理。
核心代码
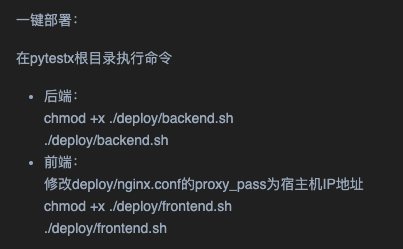
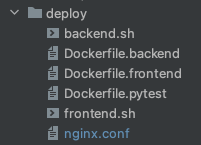
一键部署
#!/bin/bash
PkgName='backend'

Dockerfile='./deploy/Dockerfile.backend'
DockerContext=./

echo "Start build image..."
docker build -f $Dockerfile -t $PkgName $DockerContext
if [ $? -eq 0 ]
then
    echo "Build docker image success"
    echo "Start run image..."
    docker run -p 8000:80 $PkgName
else
    echo "Build docker image failed"
fi
FROM python:3.8

ENV LANG C.UTF-8
ENV TZ=Asia/Shanghai

RUN /bin/cp /usr/share/zoneinfo/Asia/Shanghai /etc/localtime && echo 'Asia/Shanghai' >/etc/timezone

WORKDIR /app
COPY ./backend .
RUN pip install -r ./requirements.txt -i \
    https://pypi.tuna.tsinghua.edu.cn/simple \
    --default-timeout=3000

CMD ["python", "./manage.py", "runserver", "0.0.0.0:80"]
数据库表
更精简,只有project和task两张表,简化平台功能,聚焦任务调度:
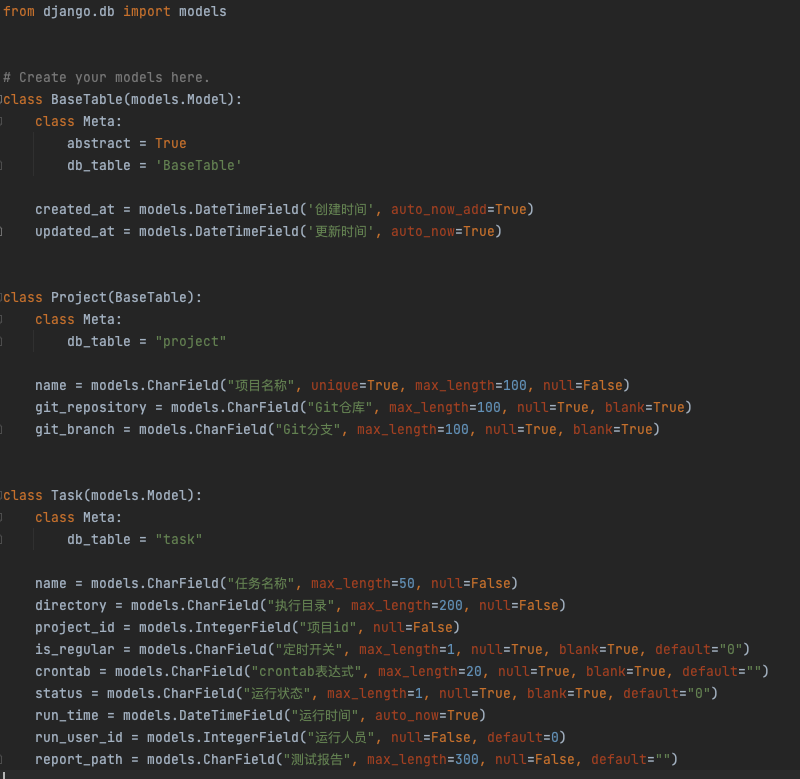
需要说明的是,如果多人运行任务,只会存储最后一次执行结果,这个问题不是核心,个人精力有限,不打算在开源项目中开发,更侧重于实现任务调度,供大家参考
执行任务
settings配置任务模式,判断执行不同分支:
def run(self):
    logger.info("任务开始执行")
    if settings.TASK_RUN_MODE == TaskRunMode.DOCKER:  # 容器模式
        try:
            self.execute_by_docker()
        except Exception as e:
            logger.info(e)
            if e == TaskException.DockerNotSupportedException:
                logger.info("降级为本地执行")
                self.execute_by_local()
    if settings.TASK_RUN_MODE == TaskRunMode.LOCAL:  # 本地模式
        self.execute_by_local()
    self.save_task()
容器模式
先根据docker -v命令判断是否支持docker,然后docker
build,再docker run
def execute_by_docker(self):
    logger.info("运行模式:容器")
    output = subprocess.getoutput("docker -v")
    logger.info(output)
    if "not found" in output:
        raise TaskException.DockerNotSupportedException
    build_args = [
        f'--build-arg CMD_GIT_CLONE="{self.cmd_git_clone}"',
        f'--build-arg GIT_NAME="{self.git_name}"',
        f'--build-arg EXEC_DIR="{self.exec_dir}"',
        f'--build-arg REPORT_NAME="{self.report_name}"',
    ]
    cmd = f"docker build {' '.join(build_args)} -f {self.dockerfile_pytest} -t {self.git_name} {BASE_DIR}"
    logger.info(cmd)
    output = subprocess.getoutput(cmd)
    logger.info(output)
    cmd = f"docker run -v {REPORT_PATH}:/app/{os.path.join(self.exec_dir, 'reports')} {self.git_name}"
    logger.info(cmd)
    output = subprocess.getoutput(cmd)
    logger.info(output)
将项目仓库、执行目录、报告名称信息,通过参数传入Dockerfile.pytest
FROM python:3.8

ENV LANG C.UTF-8
ENV TZ=Asia/Shanghai
ARG CMD_GIT_CLONE
ARG GIT_NAME
ARG EXEC_DIR
ARG REPORT_NAME

RUN /bin/cp /usr/share/zoneinfo/Asia/Shanghai /etc/localtime && echo 'Asia/Shanghai' >/etc/timezone

WORKDIR /app
RUN $CMD_GIT_CLONE
RUN pip install -r ./$GIT_NAME/requirements.txt -i \
    https://pypi.tuna.tsinghua.edu.cn/simple \
    --default-timeout=3000

WORKDIR $EXEC_DIR
ENV HTML_NAME=$REPORT_NAME
CMD ["pytest", "--html=./reports/$HTML_NAME", "--self-contained-html"]
docker
run的-v参数将容器报告挂载在后端服务,当报告生成后,后端服务也会生成一份报告文件。再将文件内容返给前端展示:
def report(request, *args, **kwargs):
    task_id = kwargs["task_id"]
    task = Task.objects.get(id=task_id)
    report_path = task.report_path

    with open(os.path.join(REPORT_PATH, report_path), 'r', encoding="utf8") as f:
        html_content = f.read()

    return HttpResponse(html_content, content_type='text/html')
测试报告使用的pytest-html,重数据内容,轻外观样式。
本地模式
模拟容器行为,把本地.local目录当做容器,拉代码,执行pytest,生成报告,复制报告到报告文件夹,删除本地目录:
def execute_by_local(self):
    logger.info("运行模式:本地")
    os.makedirs(self.local_path, exist_ok=True)
    os.chdir(self.local_path)
    cmd_list = [self.cmd_git_clone, self.cmd_pytest]
    for cmd in cmd_list:
        logger.info(cmd)
        output = subprocess.getoutput(cmd)
        if output:
            logger.info(output)
    os.makedirs(REPORT_PATH, exist_ok=True)
    shutil.copy2(self.project_report_path, REPORT_PATH)
    shutil.rmtree(LOCAL_PATH)
本地模式,主要用于本地调试,在缺失Docker环境时,也能调试其他功能。
配置
TASK_RUN_MODE = TaskRunMode.DOCKER
LOCAL_PATH = os.path.join(BASE_DIR, ".local")
REPORT_PATH = os.path.join(BASE_DIR, "task", "report")
class TaskRunner:
    def __init__(self, task_id, run_user_id):
        self.task_id = task_id
        self.directory = Task.objects.get(id=task_id).directory
        self.project_id = Task.objects.get(id=task_id).project_id
        self.git_repository = Project.objects.get(id=self.project_id).git_repository
        self.git_branch = Project.objects.get(id=self.project_id).git_branch
        self.git_name = re.findall(r"^.*/(.*).git", self.git_repository)[0]
        self.local_path = os.path.join(LOCAL_PATH, str(uuid.uuid1()).replace("-", ""))
        self.run_user_id = run_user_id
        self.current_time = time.strftime("%Y-%m-%d-%H-%M-%S", time.localtime(time.time()))
        self.report_name = f"{str(self.git_name)}-{self.task_id}-{self.run_user_id}-{self.current_time}.html"
        self.project_report_path = os.path.join(self.local_path, self.git_name, "reports", self.report_name)
        self.dockerfile_pytest = os.path.join(DEPLOY_PATH, "Dockerfile.pytest")
        self.exec_dir = os.path.join(self.git_name, self.directory)
        self.cmd_git_clone = f"git clone -b {self.git_branch} {self.git_repository}"
        self.cmd_pytest = f"pytest {self.exec_dir} --html={self.project_report_path} --self-contained-html"
tep-project更新
1、整合fixture,功能类放在fixture_function模块,数据类放在其他模块,突出fixture存放数据概念,比如登录接口fixture_login存储用户名密码、数据库fixture_mysql存储连接信息、文件fixture_file_data存储文件路径
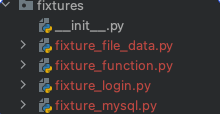
2、改造fixture_login,数据类fixture代码更简洁
import pytest
from loguru import logger


@pytest.fixture(scope="session")
def login(http, file_data):
    logger.info("----------------开始登录----------------")
    response = http(
        "post",
        url=file_data["domain"] + "/api/users/login",
        headers={"Content-Type": "application/json"},
        json={"username": "admin", "password": "qa123456"}
    )
    assert response.status_code < 400
    logger.info("----------------登录成功----------------")
    response = response.json()
    return {"Content-Type": "application/json", "Authorization": f"Bearer {response['token']}"}


@pytest.fixture(scope="session")
def login_xdist(http, tep_context_manager, file_data):
    """
    该login只会在整个运行期间执行一次
    """

    def produce_expensive_data(variable):
        logger.info("----------------开始登录----------------")
        response = http(
            "post",
            url=variable["domain"] + "/api/users/login",
            headers={"Content-Type": "application/json"},
            json={"username": "admin", "password": "qa123456"}
        )
        assert response.status_code < 400
        logger.info("----------------登录成功----------------")
        return response.json()

    response = tep_context_manager(produce_expensive_data, file_data)
    return {"Authorization": "Bearer " + response["token"]}
3、改造fixture_mysql,支持维护多个连接,并且保持简洁
fixture_function.py
@pytest.fixture(scope="class")
def executor():
    class Executor:
        def __init__(self, db):
            self.db = db
            self.cursor = db.cursor()

        def execute_sql(self, sql):
            try:
                self.cursor.execute(sql)
                self.db.commit()
            except Exception as e:
                print(e)
                self.db.rollback()
            return self.cursor

    return Executor
fixture_mysql.py
@pytest.fixture(scope="class")
def mysql_execute(executor):
    db = pymysql.connect(host="host",
                         port=3306,
                         user="root",
                         password="password",
                         database="database")
    yield executor(db).execute_sql
    db.close()


@pytest.fixture(scope="class")
def mysql_execute_x(executor):
    db = pymysql.connect(host="x",
                         port=3306,
                         user="x",
                         password="x",
                         database="x")
    yield executor(db).execute_sql
    db.close()
4、改造fixture_file_data,并添加示例test_file_data.py
import os

import pytest

from conftest import RESOURCE_PATH


@pytest.fixture(scope="session")
def file_data(resource):
    file_path = os.path.join(RESOURCE_PATH, "demo.yaml")
    return resource(file_path).get_data()


@pytest.fixture(scope="session")
def file_data_json(resource):
    file_path = os.path.join(RESOURCE_PATH, "demo.json")
    return resource(file_path).get_data()
5、添加接口复用的示例代码
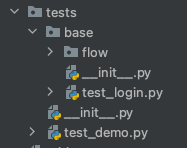
tests/base就是平台调度使用的稳定自动化用例集。
接口代码复用设计
5条用例:
test_search_sku.py:搜索商品,前置条件:登录
test_add_cart.py:添加购物车,前置条件:登录,搜索商品
test_order.py:下单,前置条件:登录,搜索商品,添加购物车
test_pay.py:支付,前置条件:登录,搜索商品,添加购物车,下单
test_flow.py:完整流程
怎么设计?
登录,每条用例前置条件都依赖,定义为fixture_login,放在fixtures目录下
搜索商品,test_search_sku.py用例本身不需要复用,被前置条件依赖3次,可以复用
①定义为fixture_search_sku放在fixtures❌ 弊端:导致fixtures臃肿
②复制用例文件,允许多份代码,平行展开✅ 好处:高度解耦,不用担心依赖问题
总结,定义为fixture需要具备底层性,足够精炼。对于业务接口用例的前置条件,尽量在用例文件内部处理,保持文件解耦,遵循独立可运行的原则。
复制多份文件?需要修改的话要改多份文件?
是的,但这种情况极少。我能想到的情况:一、框架设计不成熟,动了底层设计,二、接口不稳定,改了公共接口,三、用例设计不合理,不能算是自动化。接口自动化要做好的前提,其实就是框架成熟,接口稳定,用例设计合理,满足这些前提以后,沉淀下来的自动化用例,几乎不需要大批量修改,更多的是要针对每条用例,去修改内部的数据,以满足不同场景的测试需要。也就是说,针对某个用例修改这个用例的数据,是更常见的行为。
如果项目变动实在太大,整个自动化都不能用了,不管是做封装还是平行展开,维护量都非常大,耦合度太高的话,反而还不好改。
跟着pytestx学习接口自动化框架设计,更简单,更快速,更高效


